There are three fundamental concepts that define the DNA of webs: (1) they are primarily based upon a standard computer code known as HTML, (2) they are comprised of “nodes” and “links,” and (3) they are structured in hierarchies that require menus and indexes to navigate.
Webs are most commonly built and accessed online using a Web browser, but it’s possible to design a local “web” (or collection of nodes and links) to be accessed offline. An ebook that you download is a collection of nodes and links that runs off a local device that does not necessarily have to be connected online.
HTML code as the DNA of Web sites
The Internet is built upon a computer code known generically as HTML, which stands for HyperText Mark-up Language. Although the standards for HTML continue to evolve, at its heart is a simple, standardized computer code, or “mark-up” language. For a typical Webpage, there are two versions: (a) what your Web browser shows you, and (b) the HTML code behind the scenes.
Like all of the Creative Cloud applications, the software that’s best for building webs is designed according to the fundamental DNA of the media format it produces. The image below shows the Dreamweaver interface, which has three workspace layout options: Code, Split, and Design. The image shows the Split workspace which displays the HTML code on the left and the Design view on the right.
Like all of the Creative Cloud applications, the software that’s best for building webs is designed according to the fundamental DNA of the media format it produces. The image below shows the Dreamweaver interface, which has three workspace layout options: Code, Split, and Design. The image shows the Split workspace which displays the HTML code on the left and the Design view on the right.
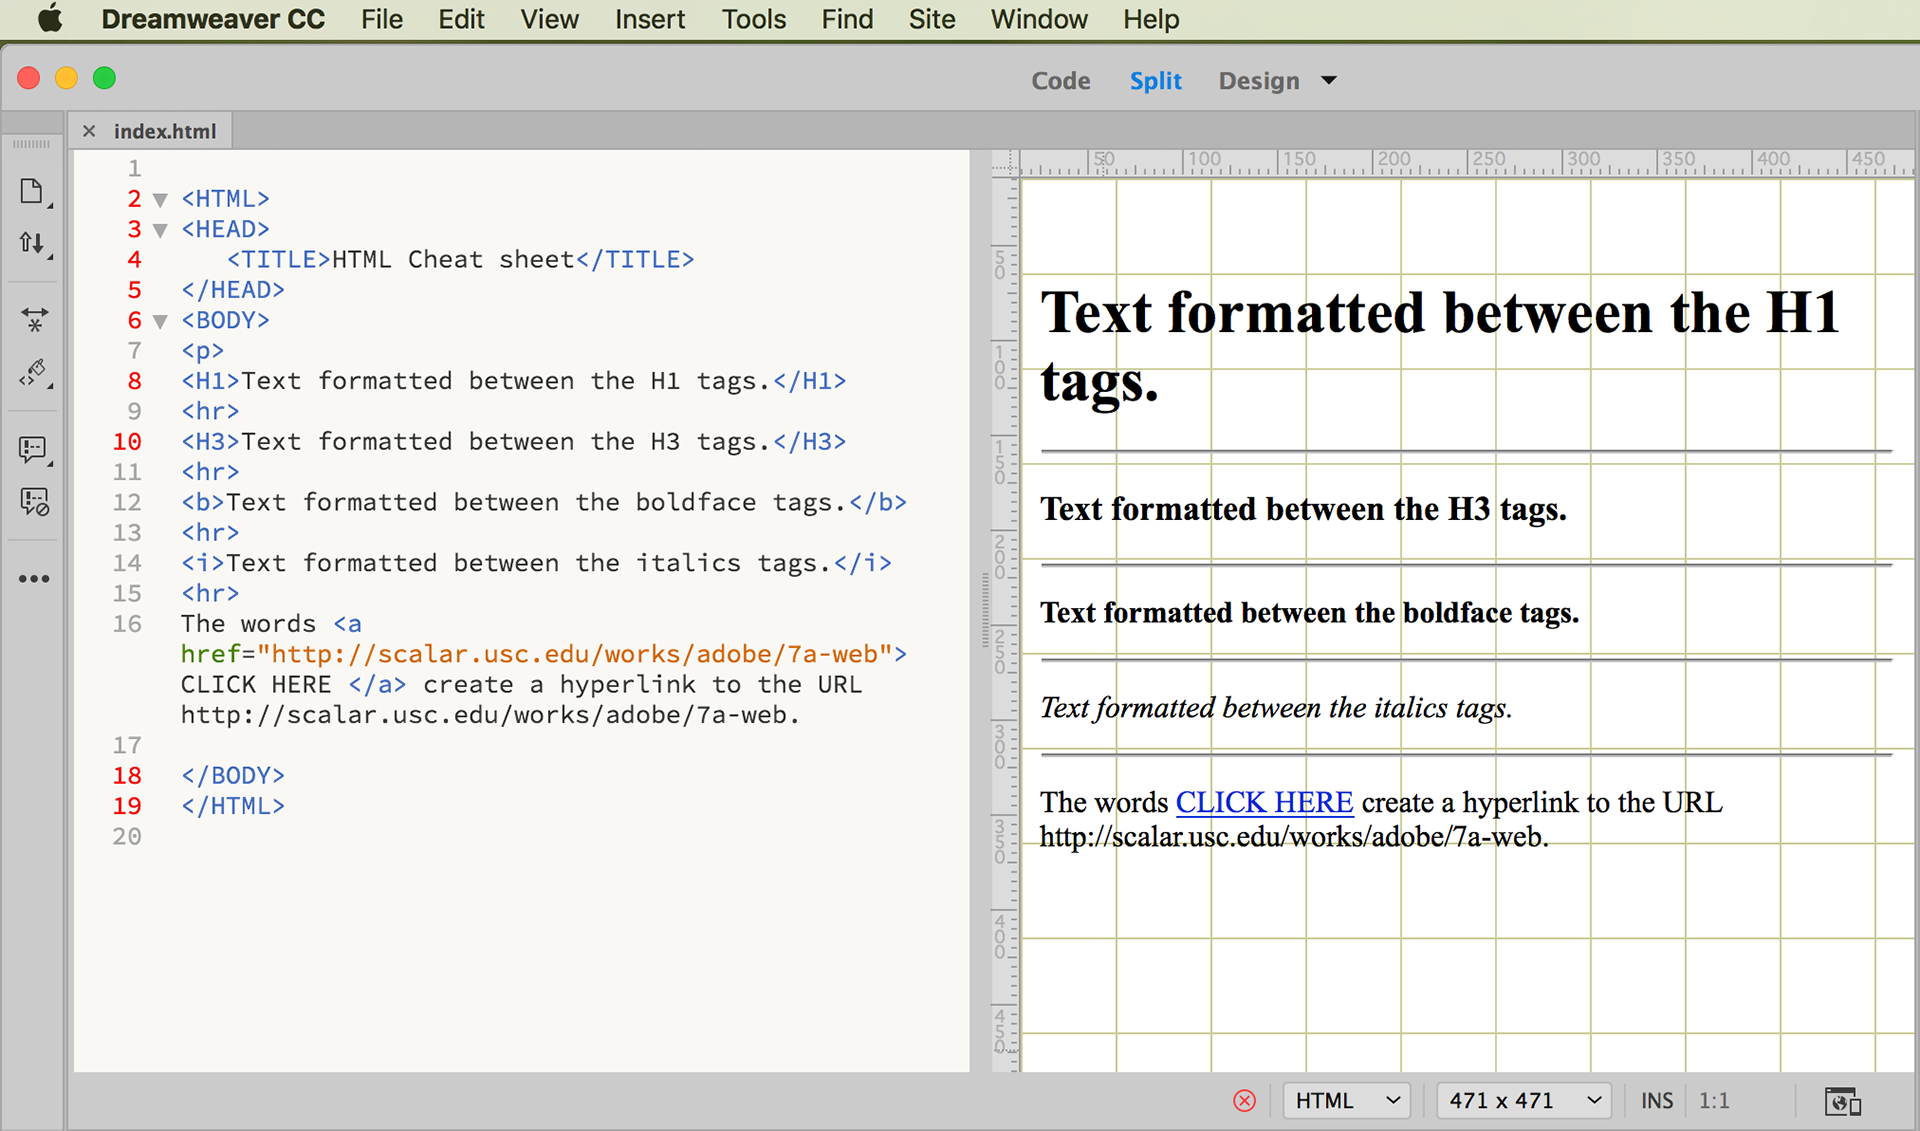
Compare the code on the left with pane on the right, which shows how a Web browser will display that HTML code. HTML code works primarily in pairs (highlighted in blue), with the first “tag” (indicated in angle brackets) starting a mark-up function, and the corresponding concluding “tag” at the end. The <hr> tag does not work in pairs; can you see how each <hr> tag produces a horizontal line in the Design view? Notice in the right “Design View” the text formatted in italics, then look in the “Code View” at the corresponding HTML tag pair <i> . . . </i> that tells the Web browser to display the text between the pair as italics.
In the Code View there are also some tags at the top of the screen (on lines 2-6) and the bottom of the screen (on lines 18 and 19) that set up the file as an HTML document, kind of like a front cover and back cover on a book. Glance back and forth between the code on the left and the display on the right, and you can begin to see the pattern and how HTML works. Notice, in particular, the way the hyperlink works. The URL in orange in line 16 tells the Web browser where to link to when a user clicks on the words “CLICK HERE,” which appear as a blue hyperlink in the Design View.
Websites are so ubiquitous that there many, many different ways to create them. In fact, Creative Cloud has four different applications that enable you to design and build Websites: Dreamweaver, Adobe Muse, XD, and Spark Page. One of the main differences between these four applications is the amount HTML coding you need to know, with Dreamweaver being highly code-based and Spark Page preventing you from seeing any code at all. You can operate Dreamweaver completely in Design mode without seeing the Code View, if you want, but it’s typically not used that way. The point, however, is that you need to understand that webs run on computer code, although you may never need to program that code yourself. And, the interfaces of all of the Creative Cloud web-building applications are designed according to the way computer code works, as is revealed by the Split View workspace in Dreamweaver above with code on the left and the browser display on the right.
Webs are comprised of nodes and links
What makes a web fundamentally different from a book is the way users interact with it. Instead of being a collection of pages connected in a sequence, a web is a collection of nodes connected through hypertextual links (using HTML: HyperText Mark-up Language). A book is mainly limited by the bottom of one page leading to the next, while a web is more free because any node can be linked to any other node, potentially. Take a look at the Prototype Workspace from XD below, which shows four nodes and the various links that connect them.
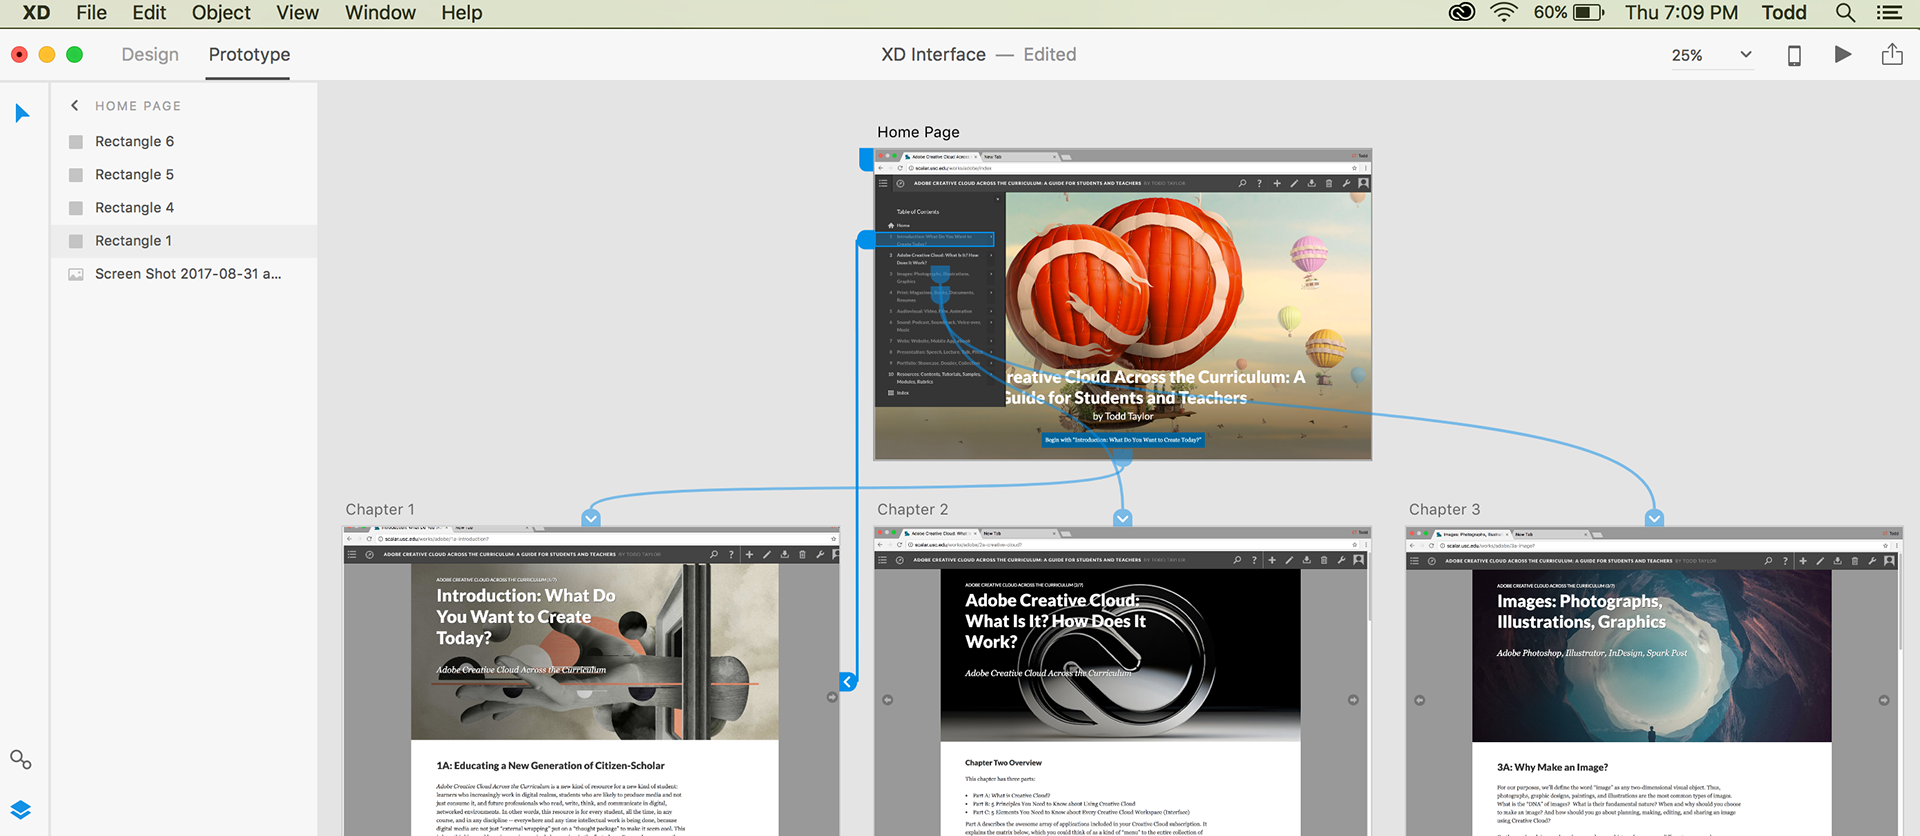
In the XD workspace above, the Home Page shows the pull-down menu with three links from that node to the first nodes in Chapter 1, 2, and 3. XD represents these links with blue lines and arrows, and the interface makes these links easy to visualize and program simply by dragging them around. Also note the blue bar at the bottom of the Home Page, which acts as an additional link to the Chapter 1 node. There are two links and two ways to click from the Home Page to Chapter 1, which demonstrates how webs can make hypertextual links between nodes in a wide variety of ways — everything doesn’t need to be in a straight line, like in books.
Each of the interfaces for Dreamweaver, Adobe Muse, and XD makes it easy to build nodes and establish hypertextual links between them, because nodes and links are part of the fundamental DNA of webs. You can see the potential here: text, images, video, information, media, documents — almost anything can build a node, and you can connect and organize a collection of nodes using a powerful array of links that can be arranged and rearranged in a wide variety of customized ways.
Webs are structured in hierarchies that require menus and indexes to navigate
Designers begin web sites by building what they call “wireframes,” which is skeleton or outline that structures the nodes in the site. Because nodes can be linked and connected in a variety of ways, they often need hierarchies and structures to make them navigable for users. The image below shows a wireframe structural outline in Adobe Muse.
Designers begin web sites by building what they call “wireframes,” which is skeleton or outline that structures the nodes in the site. Because nodes can be linked and connected in a variety of ways, they often need hierarchies and structures to make them navigable for users. The image below shows a wireframe structural outline in Adobe Muse.
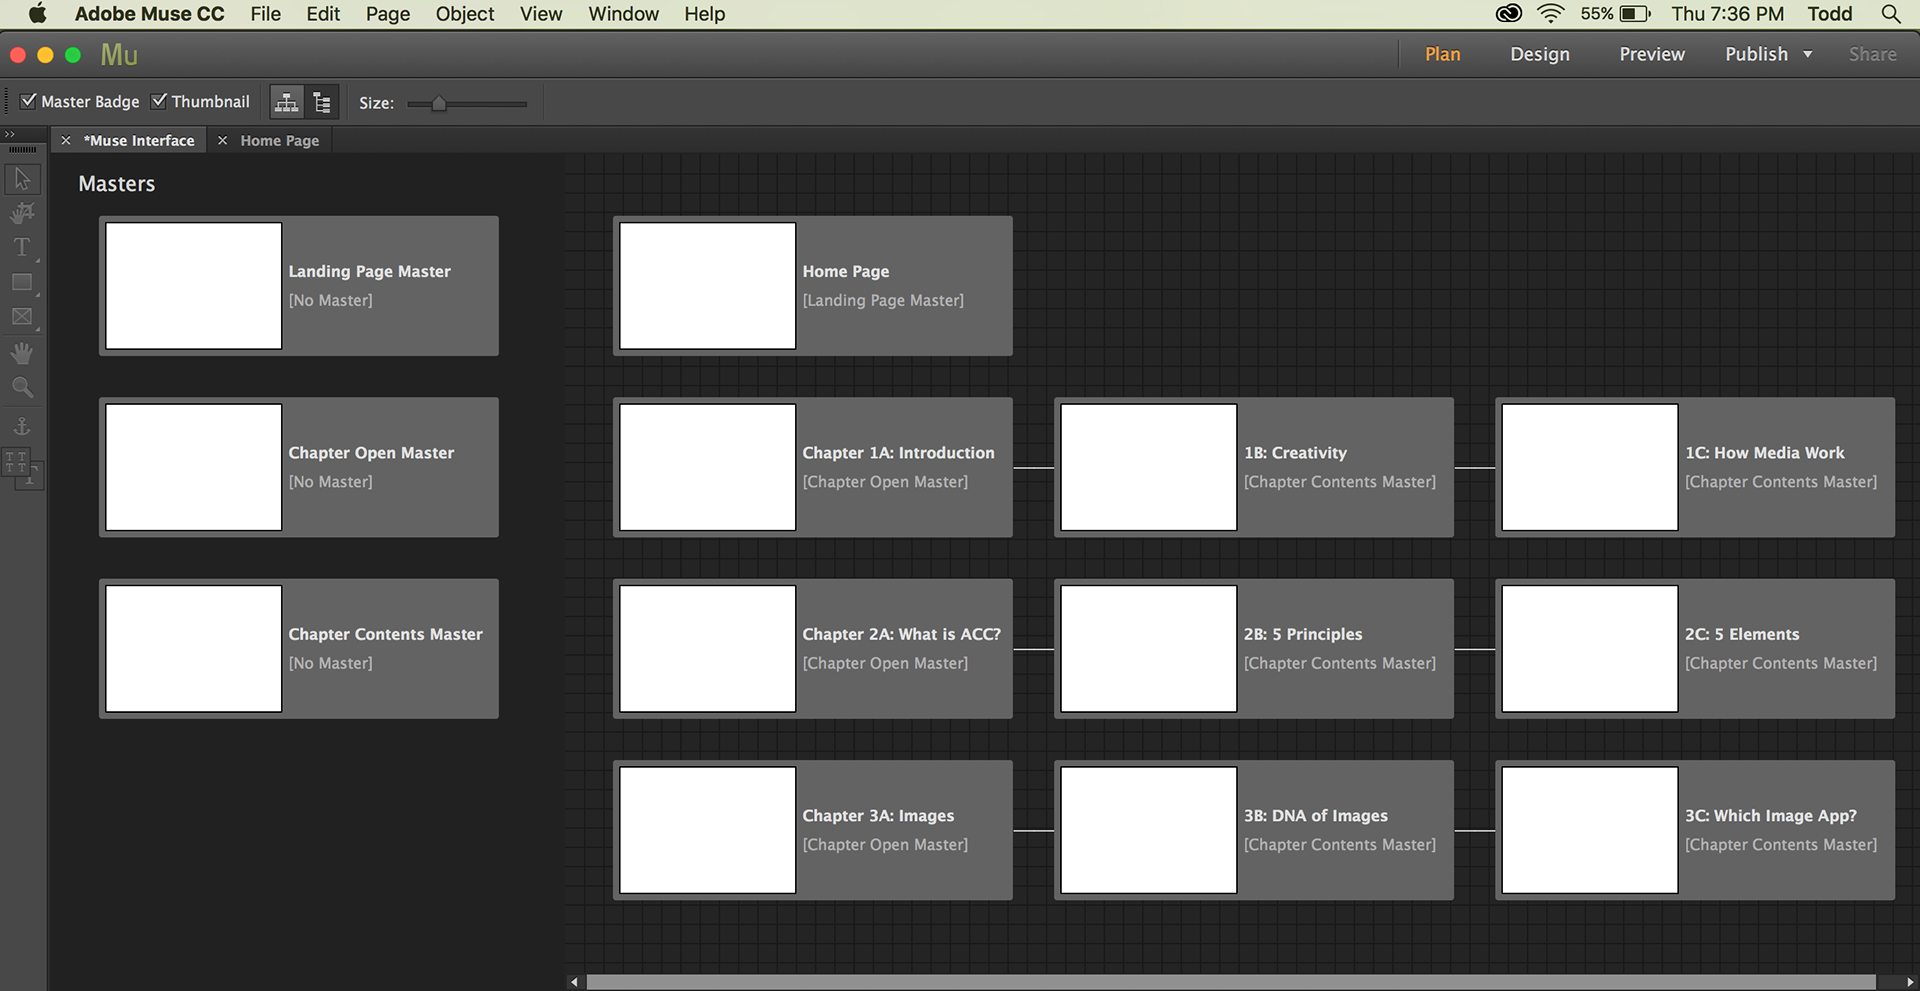
In this Adobe Muse workspace interface, there are two areas: three different “master pages” in a column on the left, and ten actual pages in columns and rows on the right. The ten pages (or nodes) on the right show the wireframe structure for Adobe Creative Cloud Across the Curriculum. The Home Page is at the top, and each Chapter is in a different row below. This is the wireframe for the opening and the first three chapters of the very Website you’re reading right now.
Notice in the interface above there are four different workspace options for Adobe Muse: Plan, Design, Preview, and Publish. The screen above is made using the Plan workspace — it’s where you build the wireframe for the entire site. Next, you could move into the Design workspace where you build master pages and individual pages. It’s helpful to use preset functions in Adobe Muse (also known as “widgets”) to build things like navigation menus in master pages so that there will be consistent ways for readers to move through the nodes and links without getting lost. You’ll want to test your Website in Preview mode.
It’s very important to emphasize for the moment the Publish workspace. Theoretically, you could build an entire web on your computer and never publish it online, but that defeats the purpose of most Websites. In order to publish your webs online, you must have a server and a domain that will “host” or make accessible your web pages through the Internet. So, there’s a big consideration and a big second step to building Websites, namely: You must have a host server arranged as place to upload and serve the webs you build. Dreamweaver, Adobe Muse, and XD have Publish and Share menus to transport your files onto an online host server, but you have to arrange for the host server yourself. Spark Page does not require you to arrange for a server because it is automatically hosted on Adobe servers, but this means you can’t build and design Spark pages as robustly as in the other applications.
So, the interfaces and workspaces in Creative Cloud web-building applications are designed not only according to the DNA of webs, but also according the nature of Website building, which moves from planning, to designing, to previewing, to publishing.